7 February, 2003
Throttle Bush
Replacement Instructions
To make this replacement, you will have to “assume the Lotus position” and crawl head-first under the dash. Take a Phillips-head screwdriver and a 7mm spanner with you. You should be able to identify the throttle linkage by following the pullrod from the pedal. The whole mechanism is mounted on a baseplate that is screwed to the chassis with two large Phillips-head screws. Unscrew the two screws (the nuts are welded on the other side) and let the baseplate dangle on the throttle cable and pullrod. This does not disturb any adjustments so you don’t need to worry about getting it back in exactly the same position.
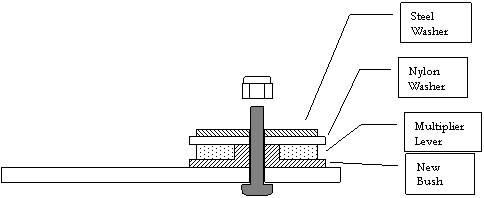
Locate the pivot by reference to the diagram below:

After removing the bolt, you should find a steel washer, two nylon washers and a cylindrical nylon bush that forms the pivot. Discard one nylon washer and the cylindrical bush. Replace with the supplied “top hat” bush. No lubrication is required. Discard the original nut and bolt, if they are worn, and replace with those included in this kit. (The bolt is not replaceable on Elises built after 2000.) Assemble as per the diagram below. Be careful not to over-tighten the bolt – the lever should pivot with minimum friction. Then screw the baseplate back onto the chassis and you’re nearly done.
If no-one has tried to adjust the throttle before you, then you are lucky: there is no more adjustment required because this replacement takes it back to standard. However the throttle cable may require readjustment. Check that there is a tiny amount of slack in the cable at idle. With an assistant (or a brick) on the pedal, check that the throttle opens fully by trying to turn it further by hand. The pedal should hit the down-stop after the throttle is fully open, tensioning the cable slightly. The cable can only be adjusted at the engine end – use two 14mm spanners. You may need to reset the stops on the pedal to get full travel. In the worst case you may even need to reset the pull-rod length. The plastic ball joints can be popped off to do this.